Saturday, 15 September 2012

Fascinators
Part II
 
Here we are 2 months after the initial post about the fascinators I was working on and still no photo of the birdcage veil. Not because I've forgotten but because it doesn't look right on my 'head' form Seems I'll be needing a wig for display purposes.
 
After working on custom orders all week friday arrived with nothing new to display on my table  at the Farmers Market on saturday. So I thought I'd quickly make up a little tophat fascinator out of some leftover fabric from a drapery panel I had shortened.
 
I was happy with the result, apparently so was my 18  month old son who picked it up  and held it atop his lovely little red head.
 
 
So many things to make so little time...
with Halloween approaching there are many projects to be started in the near very near future.


Thursday, 9 August 2012

Late Night Creations

For those of us devoted to (or obsessed with) our craft. Sleepless nights happen. Eyes get heavier and heavier. The brain tells us that soon we'll be making more mistakes than progress. Then even if we force ourselves to bed we lay exhausted but awake...obsessing over the current project, designing in our heads, visualizing the fabircs, the trims, the techniques...or maybe it's just me.  Last night was one of those nights. 

Getting down to the wire on a rather large comission for the fabric store I work at (to support my habit) the final project was a christening gown. While I usually favour cottons and linens for the vintage inspired gowns..


This was the first one I'd made using the bridal satin and organza. The shape was absolutely basic yet a few lace and ribbon embellishments, a few rosettes and I was pretty excited with the result even after my initial skepticism about using ivory rather than white. I think I'm actually loving the champaign tone more than if it were bright white.


I didn't take a close up of the little ribbon and rosette detail. I'll have to add one later, though I loved the result and will without a doubt be using it again (and again and again)


Friday, 13 July 2012

Fascinators...

Yet another wonderful blast from the past. I had a few fairly basic simple little flower and feather deals on my market table which went quickly. One patron asked if I could make her a pirate themed fascinator for a party she was to attend. So...I made a little tricorn hat and became obsessed.


 Just the tricorn hat alone lends itself to so many possibilities and colours. From the piratey , to the dark and sinister. To pinks and blues with ruffled trim to wear with a sack back gown. the trims and feather embellishments are endless. Then there's top hats...mad hatter, steampunk, gothic....the list goes on. Tonights project is my first birdcage veil, I suspect I will quickly become obsessed with these aswell and stock up on some russian netting online (as opposed to the much pricier local store I found that carries it)

I will add the new fascinator tonight if time allows but with market day tomorrow I typically have a late night finishing up projects and an early morning getting going.

Friday, 29 June 2012

Regency Stays


Of late I've been making and selling quite a few regency short stays. They are definitely the more common choice especially for the more petite figure, and less ample upper body. They are more like the modern day bra than any other stays (A.K.A corset or pair of bodies) being as they do not extend below the rib cage.


I haven't done much to embellish them yet but perhaps I should since they I suspect could be 'cute' enough with some embroidery or lace detail.  I'm not enamoured by them the way I am with other much more elegant corsets. But I guess embellishment is the key. Even the longer full body regency stays...the plain ones leave much to be desired. I started a pair years ago and added some very basic cording detail and a touch of embroidery. That on it's own was enough to make them quite lovely. I think I will add even more embellishment to the next pair.


This one is done in a sand coloured cotton twill. There is a drawstring at the bust to help contain the bosom a little more.

The busk inside was meant to seperate the breasts and give the rigid 'grecian' column inspired silhoutte desired at the time. Pushing the bust up to an unnatural height implying a perkiness most of us never had even at our most youthful.
The busk I made is very plain , unlike the often very intricate carvings on the originals. Young gents would often carve a busk as a gift for his sweetheart. Just because something is going to be hidden inside layers and layers of fabric and petticoats and outergarments...is no reason for it not to be attractive right?

An example of a pair from 1796 at the Museum of Civilization

Nowadays we can buy a much lighter and more forgiving metal busk from most costume/corset suppliers if we so desire..

So this particular stay could use a little more shaping with a gusset added to the bottom (for more of an 1820's shape) as opposed to the starighter more columnar 1810 silhoutte. , lacing at side seam below the waist would allow flexibility as a riding stay.
And certainly dress forms are not the best models for corsets as they have no give, they are hard, rigid and can not conform to the desired shape which is after all what corsets and stays are essentially for. To hold in, lift up and genrally manipulate the body into what we want it to be.


Sunday, 24 June 2012

Here are a couple of this weeks completed projects.

The cushion began with the emboidery. I love knotwork, so it's not uncommon for any of my decorative details (be it quilting or embroidery) to take on this form.


I didn't want to waste my efforts by leaving the cushion otherwise plain as it seemed to do the embroidery a disservice. So a few tucks, some contrast ruching, mitred corners and here we have the final result. (well admittedly there may still be some tweaking)


Another project was ofcourse flowers. both synthetic ad natural fibres. I'm never sure which I like better. I guess they both have their own purposes and I've no need to choose a favourite...simply a favourite for the specific occasion.

The synthetic ones involve scissors and fire. Obviously not a craft for unsupervised children (or accident prone adults) I'll gladly add a tutorial if you like, though I suspect there already exists a number of them out there. Once you get used to the melting properties of each fabric you can experiment to get different looks though so this is fun.

Here are the basic cut circles with small slits around the edges. I used satins and organza for the layers.


Then there was the linen flowers (made the way ribbon "flat roses" would be made but with a folded strip of linen , raw edges left unfinished and exposed. a touch of fraying cotton crochet lace, a few pearl beads and they somehow pull off a crafty yet elegant look.


Sunday, 17 June 2012

Fathers Day arrived and we were still without the perfect gift. So a run to the store for stepping stone supplies was in order. However it was too late to have one ready in time and I had to work from 12-5. So instead of a simple unexciting IOU. Here' is what my 15 month old son gave his father for Fathers Day. In booklet form.


Hey Dad...we need to have a little talk. Man to man, Father to son, you get the idea.
So last year I gifted you a stepping stone kit. A little box of "Pas Japonais" (which I still don't get) regardless, the intent was good. Make you a stepping stone with my perfect little hand and/or foot displayed front and center. It came out of the kids craft section, in a pretty little box with images of perfectly made stepping stones and shiny rocks sitting in a little garden surrounded by flowers and butterflies.. Bullroar!! We saw how that turned out, it was a bust, sad little plaster casts that dried too fast and didn't serve our purpose at all.

Now.. we won't say Mom was wrong, because we both know that Mom is never wrong...we'll say she was mislead. Mislead by those evil wizards of advertising to believe that she could ignore what she knew to be a tried and true method (As proven years earlier by my big brothers) and try the 'kids craft' version.

So Dad... this year we do things my way...the smart way...the right way.
We're going to take this here cement mix from the hardware aisle NOT the craft section. We're going to add water and mix (not stir) mix...in a manly fashion.
There will be no heart shaped moulds, no butterfly imprints.

 I love you Dad but come on...we're men. So nothing 'pretty' or 'soft' in this project.  We copacetic?
copacetic, copasetic, copesetic, copesettic [ˌkəʊpəˈsɛtɪk]
adj
US and Canadian slang very good; excellent; completely satisfactory
Very satisfactory or acceptable; fine: "You had to be a good judge of what a man was like, and the English was copacetic" (John O'Hara).

Come on Dad keep up.
So we're going to put the cement into these.
Empty meat trays. Why? Because they are deep enough, they are rectangular and they had meat in them. What’s more manly than meat and cement?
Trucks you say?
 

 Motorcycles and cars?

okay Dad I'm only a year old I don't even get an allowance yet. So back to meat and cement. We mix and pour the cement into the aforementioned meat trays, I stomp..(okay okay Mom I place my foot and or hand firmly but gently) into the still wet cement, add a few rocks or bits of coloured glass and Voila! Perfection.

Happy Fathers Day


Friday, 4 May 2012

I thought I'd take a moment this morning before I start working to post a few more photos of the progress on the quilt for my neice. I'm way behind on market preparations but will tackle some of that this morning (and for the next month)

I went over the previously quilted K with a chain stitch in purple to make it more prominent.


Added a few more trims and crazy quilt stitches.


Snapped a close up photo of the "faux cathedral window inspired thing-a-ma-bob"
unfortunate lighting for some reason makes this one appear quite yellow.


And ofcourse a butterfly (I think he/she still needs some more filler)


Now back to work to see what I can accomplish in a few short hours of being child-free.


Thursday, 12 April 2012

Womens Regency gowns are always in high demand, I've lost count of how many I've shipped out, though I may never get sick of doing them as there are so many ways to embellish and personalize each one. Men's clothing/costumes are a bit more of a treat maybe because I don't often "pre-make" them they are typically custom orders.  I thought I'd run through the outfit I'd made for one young local gent who had a regency wedding to attend.


We started with a slightly toned down shirt in white cotton,  a little less full then it could have been to avoid the bulk under his waistcoat and tailcoat.

Good for him for opting for the knee breeches, these are drop or fall-front breeches. The pants close at the waist front  then the 'bib' comes up and buttons closed over the 'fly'  Long pants were certainly an option for later regency years but knee breeches would have still been worn for formal occasions and by the older generation.

The waistcoat was in a home dec fabric which didn't photograph well with the flash so i've added a scan of the waistcoat and tilcoat fabric below (I used this same combo for Demetrius in a regency era production of a Mid'Summer Nights Dream) The pinkish/red colour in the waistcoat brings out the fine stripe in the red/brown jacket. Sort of a 'Puce' palette. A Stand-up collar, self-cover fabric buttons.
A close up of the fabrics.
And the completed look.

Next time I would likely round the front waist upard a little and make the tail all one piece with the jacket since the seperate waist seam was towards the end of the period. More 1830's I believe.


Monday, 26 March 2012

My First Fondant Cake

So this isn't sewing related but for those creatively inclined, one outlet is not always enough.  I'm a big fan of homemade birthday cakes over store bought, simply because the love is in them. I remember my sons and their father making me a birthday cake, it was lopsided and slightly gooey in the middle, and they stopped short of icing it telling me that I'd have to tackle that but it was still such a nice surprise. It may have been my favourite cake ever.


At any rate, I decided for son number 3 I would attempt a fondant covered cake for the first time, since traditional frosting was never my forte and I always had to tackle cakes like craft projects  in order for them to turn out.

After much anxiety and a whole lot of recipe searches I decided on marshmallow fondant because several people claimed it was easier to work with. The recipes I found all used a microwave to melt the marshmallows. I lacked a glass bowl large enough so I used a metal bowl on top of a large pot of boiling water as a makeshift double boiler.

I started with greasing the counter with vegtable shortening, poured 4 cups of icing sugar onto that and made a well in the centre.

I added 4 Tbsp water to the bowl (or double boiler) and 8 cups of mini marshmallows, stirred these fairly constantly until they were melted and poured the mixture into the well.
(I tinted this one while the marshmallows were melting, I did two others white and tinted them  after removing them from the fridge in preparation for rolling)

Grease your hands very very well and slowly start folding the powdered sugar over the marshmallow (careful it is pretty warm and very sticky) and continue this way until you can knead it, adding more icing sugar if sticky or a bit of water if it becomes dry.  When it is well mixed greas the outisde of the fondant ball or log with shortening and wrap it tightly in saran wrap, then place in  plastic container or baggie over night.

The next day I made all the cakes. I used cake mixes and made them more dense by adding an extra egg (4 total per cake mix) adding a pudding mix and reducing the liquid (recipe called for 1 1/4 cups water or milk, I used about 3/4 cups milk)


Next  I cut the cakes flat and in half (with bread knife) and stacked them with  a buttercream frosting between the layers (I used this recipe at wilton.com )
 and iced the sides and top with a thin layer, then placed them in the fridge while I got going with the fondant.

I put the fondant in the microwave for 10 seconds at a time to make it soft enough to knead, coated the counter with  icing sugar again and rolled it out to between 1/8 - 1/4" ( I'm no expert but it was pretty basic to knead and roll) there are plenty of youtube videos and blogs out there who can explain it better than I can. I did darken the green a bit aswell by adding a few drops of food colouring while kneading (a little messy but washed off my hands and counter easily)

I enlisted a second set of hands to just lift the sheet of fondant and place it over the cake, rather than rolling and unrolling it on the rolling pin. Shaped it and worked it around the cake until it fit nicely with no wrinkles, cut it around the bottom and put it aside to repeat with tier #2. There was plenty of green left over so I took about 1/2 the next batch and tinted it blue for the 'sky'. then two tiny little balls to tink pink and yellow for the flowers.

Next I used a little left over storebought chocolate icing for the tree trunks, then mixed a generous tablespoon of it with a tablespoon of the buttercream frosting to make the dirt pile for gopher, and tinted the rest green to get the nice dark green leaves without using all of my food colouring.

Next step was to print out the characters. In this case  the hundred acre woods theme meant pooh and friends but this background could quite easily work for just about any animal or character group. We looked around for little figurines but there was nothing local  until we found the bath toys. These were obviously too big for the landscape but made nice toppers for the cake. The characters were then glued to an old notebook backing (because I couldn't find my cardstock paper to print on) and the attached to toothpicks to be arranged around the cake.


Then on top we had the three tub squirter toys we'd found, aswell as a little singing/light up banner that we hot glued to two wedding cake pillars held in place by dowels.

The overall look was  pretty impressive for someone with minimal cake decorating skills. I've never used the store bought fondant so I can't compare the two but from this experience I would definitely say that marshmallow fondant is a good place to start if you find the idea of fondant intimidating. I had no problems with it tearing , since it was light enough and the marshmallow didn't need to be rolled extremely thin. I suspect for lots of fondant detailing, ribbons, stripes etc, the traditional fondant may be more appropriate but in this case...it worked for us.


Thursday, 22 March 2012

Here is a quilt I started for my neice (the only girl out of the 6 children my sister and I have )  so she's a little spoiled with pretty things from Nana and Aunt Amy. At any rate i started it before she was born and now that she's coming up on her 3rd birthday this April I had better pull it out and finally finish it.


It started with my first attempt at ribbon embroidery. I had no real instruction and no silk ribbon so i usd a standard 1/4" satin ribbon (white) and believe it or not a package of seam binding (coarl) and a discontinued craft ribbon from Michaels (purple) then I did a whole lot of vine/ french knot clusters in embroidery floss...and not too bad for my first try.


Add some ruching, some lace trims, a little smocking, assorted hand quilting patterns, undulated pleats and pin tucks and we get a white on white textured quilt.


Thereare a few more photos but I'll add some more to it this week and update the photos... I now have a book on silk ribbon embroidery and have drastically improved many of my fabric manipulation techniques since starting this years ago. (Perhaps why it's taking so long to finish, I almost want to undo and redo some of whats there) Must resist that urge though and settle for tweaking and adding to.
Oh and here is my picture perfect neice in her beautful red fur and siberian tiger lined coat. (Also gifts from Aunt Amy, they were part of a challenge at work where we were asked to use the fur throws in a non-traditional way)

 I still have a small piece of the siberian tiger throw which I think I will shape like a "tiger skin rug" for my son


Saturday, 4 February 2012


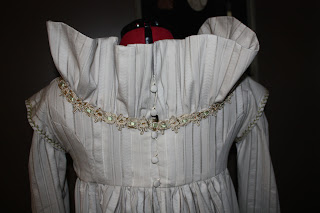
This gown was inspired by a photo of a 1795 gown in my big beautiful books of the collection of the Kyoto Costume Institute


I loved the bodice detailing with the criss-crossing pintucks, the ruched band  at the lower bust, the ruffle around the collar. (Mine was in the same fabric as the dress and a little wider than the original)
The edge of the little cap oversleeve is hand embroidered with a leafy vine. I used a gold trim around the base of the ruffle and fed a green ribbon through it along with some tiny orange and red seed beads to tie it in to the embroidery I did at the hem of the skirt.

I used a piece of the dress fabric as a backing for the embroidery, it shows a little in the photo views but once over a petticoat would be a little more discreet. I didn't want to use interfacing since the white showed through the openwork of the fabric.
I used green ribbon to gather the band under the bust since none of the cream/ivory/off white ribbons quite matched the tone of the dress I decided contrast would be better.

I gave it a back button closure with self-cover fabric buttons, though the original was probably closed at the side/front.  I went with a straight long sleeve with the  same embroidery at the wrist. The original had a bent sleeve but since I had no idea who would be buying this dress I wanted to leave some flexibility in the fit of it.


As always there are things I would do differently if/when I make this sort of dress again. Over all though I was quite happy with the way it turned out. (Though I do wish I'd photgraphed it over a petticoat to give the skirt more fullness)