Saturday, 4 February 2012


This gown was inspired by a photo of a 1795 gown in my big beautiful books of the collection of the Kyoto Costume Institute


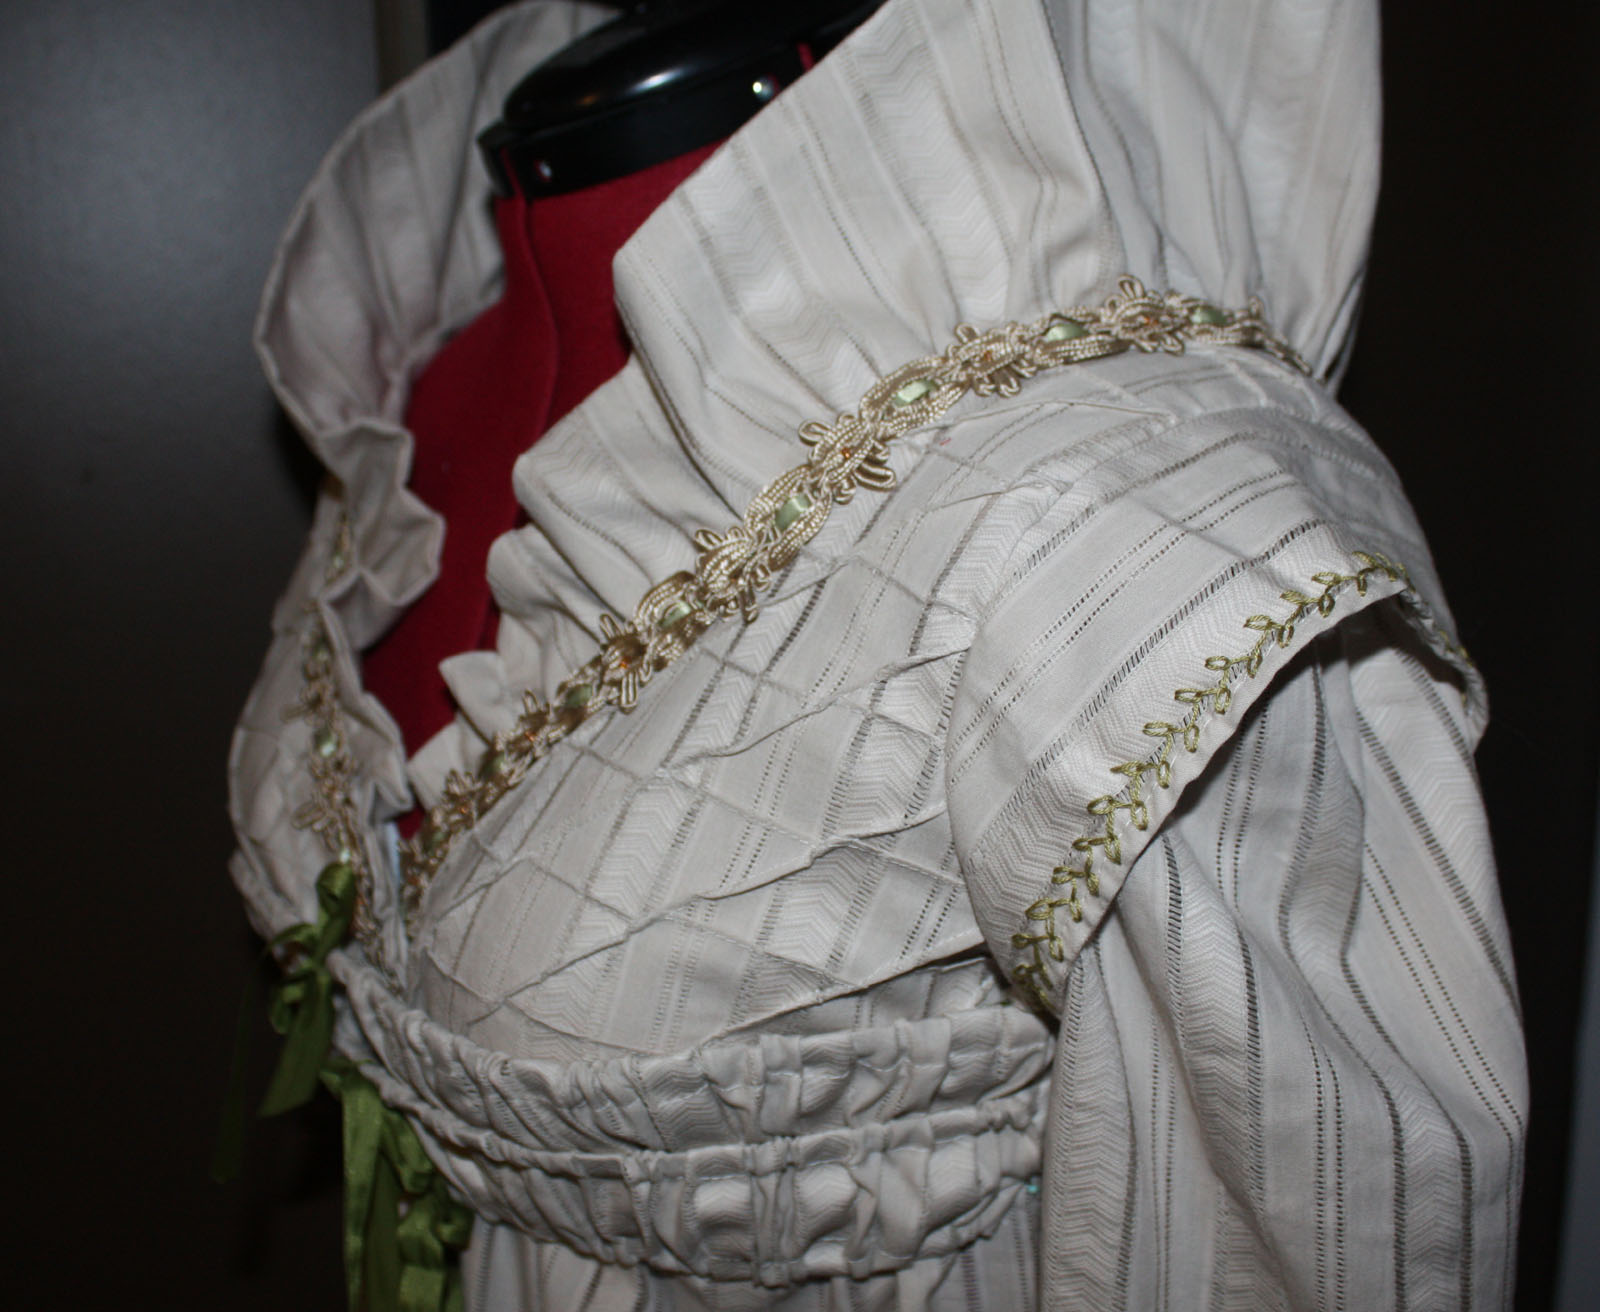
I loved the bodice detailing with the criss-crossing pintucks, the ruched band  at the lower bust, the ruffle around the collar. (Mine was in the same fabric as the dress and a little wider than the original)
The edge of the little cap oversleeve is hand embroidered with a leafy vine. I used a gold trim around the base of the ruffle and fed a green ribbon through it along with some tiny orange and red seed beads to tie it in to the embroidery I did at the hem of the skirt.

I used a piece of the dress fabric as a backing for the embroidery, it shows a little in the photo views but once over a petticoat would be a little more discreet. I didn't want to use interfacing since the white showed through the openwork of the fabric.
I used green ribbon to gather the band under the bust since none of the cream/ivory/off white ribbons quite matched the tone of the dress I decided contrast would be better.

I gave it a back button closure with self-cover fabric buttons, though the original was probably closed at the side/front.  I went with a straight long sleeve with the  same embroidery at the wrist. The original had a bent sleeve but since I had no idea who would be buying this dress I wanted to leave some flexibility in the fit of it.


As always there are things I would do differently if/when I make this sort of dress again. Over all though I was quite happy with the way it turned out. (Though I do wish I'd photgraphed it over a petticoat to give the skirt more fullness)


Thursday, 2 February 2012

Gold Linen Regency Gown


This is a Fabric I wish I could have gotten more of. It's a lovely gold linen with an embroidered eyelet detail along one edge (which I used for both the hem and the front of the bodice) This is a drop front regency style dress.


The back is pleated and I just love the way the fabric hangs.


I added several rows of pintucks and a matching picot edge ribbon to match the deatil on the sleeves.

This dress has already found a home and I have almost enough for another though I may have to play around with it a bit, either adding a complimentary sleeve or shortening the skirt as an 'overskirt' with a cream petticoat...who knows.

Wednesday, 1 February 2012

Happy February! I've started this blog to share my works in progress, trials and tribulations of an artisan. I love historically inspired techniques be it smocking, embroidery, fabric manipulation, crochet or whatever comes my way. In the next few months I'll be trying to prepare for Osgoode's Medeival Festival, The Cumberland Farmers Market and assorted craft sales along with stocking my website and building costume inventory for sale/rent next year. Lately I've had a thing for purses, I've made (and sold) several and just can't seem to shake the bug. I'm planning to start a new silk one very soon as a donation for a charity silent auction so those photos will hopefully be coming soon.  My next few projects will likely be based around fabric manipulation and origami, aswell as ribbon embroidery. Not to mention medieval gowns and coifs made from assorted linen fabrics.

Here's a few of the clutches I've already made

The back one is a green linen with a few pleating and ruching techniques to add texture. The bronze one is a pleated Lamé with flowers along the frame. It's the same design I had used to make my sisters bridal purse in silver. The front one is an off-white bridal jaquard fabric that I added fabric flowers and embroidery too. Even the flowers were made using different techniques. The rust coloured satin were made using half circles folded stitched along one edge, gathered at the bottom to create each petal. The blue ones were cirles of synthetic fabrics snipped around the edges and melted by holding the 2-3 inches from a candle flame to curl and seal the raw edge.


Thanks for looking.
There are pleny of gowns, home décor, and miscellaneous items at my website.